
Writing up the last post about my point-and-click interface turned out to a be pretty good way of keeping me organized so I thought I’d do the same for my current inventory setup. As before, I’ll be using Playmaker, this time I’ll also be using Arraymaker and EasySave2 so you’ll need the actions for those as well…
For my purposes, an inventory needs to perform several functions:
- Keep track of items collected
- Display relevant icons for each item
- Allow using items with scene objects/characters and vice versa
- Allow combining of items within the inventory
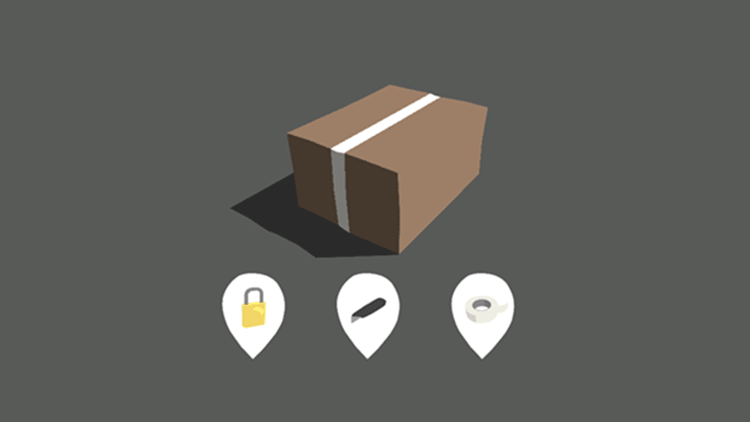
It also needs to work across multiple scenes, if you pick up an object in one room you’ll want to be able to use it in another, and upon re-entering said room, we’ll need to make sure any objects previously collected don’t reappear. For a simple test, I have two separate scenes, one with several items to collect (padlock, knife and tape) and one with a static object (cardboard box with key inside) with which to interact:


The 3d objects you can see there are Scene Items, the Inventory Items prefab contains the icons we’ll use to fill the inventory (in this case TK2d sprites), and the Inventory object keeps track of any changes via two Playmaker Array List Proxy components; referenced as Inventory and Collected Items respectively (not shown).

Above is the FSM Template used for each Scene Item. Each have a couple of local GameObject variables exposed in the inspector: Inv_Item for designating the corresponding Inventory Item (eg. ITEM_Knife is paired with INV_Knife) and Inventory just to set the reference to the relevant scene object. There is also Self (Gameobject) and Name (String). Upon clicking:
- we add the relevant Inventory Item to the Inventory array and make sure the icon is active
- get and add the objects name to the Collected Items array
- deactivate the Scene Item
You might have noticed that we’re storing the Inventory Items as an Array List of GameObjects while we’re storing the Collected Items as Strings. The issue with using an array of objects across scenes is that upon loading, if an object in one scene doesn’t exist in another it gets stored as an empty slot, I’m using auto save/load when exiting/entering scenes so the list will get overwritten as soon as you change scene a couple of times. There is probably a solution using Resources.Load but I’ve gone for the simpler method of simply storing the Scene Items by their Name and running GameObject.Find when loading each scene. This doesn’t affect the Inventory Items which all need to be available in every scene.


- Upon Scene Load we load the two Array Lists from a previously stored save file. At this stage all potential Inventory Items are active and in scene so we have no issues building an array of GameObjects. After our arrays are both populated without issue we set about updating the scene to match, firstly deactivating ALL the Inventory Items and activating ALL the Scene Items.
- We then cycle through each of our arrays and activate/deactivate the relevant Items, for the Inventory Items (in yellow) this can be done directly while for the Scene Items (in red) we have to use GameObject.Find first.
- To arrange the Inventory Items we simply set the position of the first one to a predefined Vector3 (Inv_Slot) and for each subsequent Item we increase that a little. When the cycle is finished Inv_Slot is reset to its original value.
- Standard save/ load functions assigned to key presses and the scene switch. Note, as with Scene Load, we need to make sure all Inventory Items are active before updating the array or we’ll end up with empty slots.
If you’re testing the scene at this stage you’ll need to create the autosave.sav file or it’ll throw a file missing error. To do this:
- temporarily changed the Start State to Idle
- temporarily rename the Save File in the Save Arrays state to autosave.sav
- start the scene and hit the S key

Don’t forget to change the Start State and Save File name back to the way they were afterwards. Now when you start the scene and subsequently change scene, autosave.sav should get updated. The Scene Select FSM looks like this:

Now that we hopefully have the inventory updating with Items being added to it, we need to sort out interactions within it and getting Items back out again. The FSM template for individual Inventory Items is set up as follows:


- We only want to select one Inventory Item at a time so a global variable Cursor State keeps track of when the cursor is “occupied”. We can then check if a user is trying to select an Item or use a previously selected Item on something else. To provide some visual feedback we scale up selected Inventory Items slightly and then back down when reset.
- We store the currently selected in a Global Variable Selected INV Item in order to access it either from other Inventory Items or from Scene Items. Scale up when selected with a first click, deselect and scale down with a second click on the same Item.
- If a player clicks on an Inventory Item with another already selected, we check through an array of Compatible Items and if necessary, create the Result Inv Item, add it to the Inventory array, remove the second picked Item and tell the Inventory to cycle through and reorganize. Finally resetting all the Items to their original states and Cursor State to 0. This happens in the video with the lock and key.
Although not really exploited in this scenario, each Inventory Item has its own Array List Proxy containing any compatible Items. In this case we could just as easily have used a single GameObject variable but the setup allows for a bit more variation eg. a lock object that could be opened with a key, a hairpin, a piece of wire or a screwdriver you could just drag and drop them all into slots on this array and check through them when necessary.
Once we have a selectable inventory we can test it out in the second scene, the box has the following FSM:

The box is actually two separate objects, one open, the other closed, a Global Variable (bool) Box Open is used to keep track. On click we compare the previously set Selected INV Item with a local variable and activate/deactivate objects as required and update Box Open.
So that’s a pretty simple inventory system working and the beginnings of a save system too, you can see a video of it in action on YouTube here. There’s an awful lot that could be optimised in this setup so I might update at a later stage. As always, comments, crits and corrections are very welcome.
Man…I really want this scene so I can learn it. May you put it to download?
I can’t really share the scene I’m afraid, sorry about that. If you follow the steps above though it shouldn’t take you too long to recreate. Are you stuck on something in particular?
Sad… I’m new in Playmaker and I’m lost here. Seen like you tried to show the variables and events in a generic way and it’s mixing up in my head…
I started a thread on the Playmaker forums when I originally posted this setup:
http://hutonggames.com/playmakerforum/index.php?topic=4780.0
Maybe someone there could share a scene/project with you? (Mine’s buried in a larger project and full of bits I can’t share!) Also, Jean uploaded some Arraymaker sample scenes, including an inventory I think, here:
https://hutonggames.fogbugz.com/default.asp?W715
They might be worth a look?
Thank you very much!
I’m also creating an Adventure Game, I already writed the whole script and drawed the characters, now I’m studying the script that I need so that I can start putting everything in Unity and see it running.
Hope we stay in touch and change Ideas.
Loved your Artwork!
Regards.
You’re welcome, thanks for the kind words and good luck with your game!
Great tutorial! Everything has been super straightforward and the whole system worked great, but I have some questions. Could you tell me a bit more about the Main Camera in this scene? I noticed there’s an arrow there so there must be something parented to it. Did you use sprites or GUITextures for the inventory icons and the NextSceneButton? I have a double camera system – a persp camera for the scene objects, and an orthographic one to display the inv icons and the arrow-next scene button (I used sprites with colliders), plus everything UI related is on a layer which the ortho camera renders on top of the persp one etc) and when I click on the inv icons during gameplay nothing happens. If I deactivate the persp camera, everything works perfectly. Any help would be welcome and thank you again for this great tut! Cheers!
Glad you found some of it useful! When I set this scene up I was using sprites for the inventory icons etc. Since then I’ve swapped everything out for 3d meshes, I found it easier having everything the same.
I too had difficulty with cameras! Initially I had the exact same setup as you’ve described, my problems seemed to be related to raycasting. I think the mousepicks, by default, use whichever camera is tagged as main? By using two cameras with different FOVs you are potentially casting rays from one point while looking at the scene from another! That would explain why your setup works when you turn one camera off possibly? To click seamlessly between UI and scene objects you’d need to find a way to switch where you cast rays from depending on where you were clicking, the two elements are in completely different spaces. Not something I could get working I’m afraid!
My current solution is to use two identical perspective cameras, one parented to the other, dedicating one to inventory and UI. This means the raycasts always line up! Not Ideal though for a lot of reasons! At the moment I have my inventory scaled down really small and sitting really close to the UI camera, all of that is then parented under the main camera!
I’m waiting for Unity 5 before testing out the new Unity GUI stuff, hoping it’s a bit friendlier than the old one!
Hope that makes some kind of sense!?
Yes it makes perfect sense! I just thought maybe I missed something in the tutorial but it’s the whole raycast thing – and the fact that the second cam is set to ortho.. Thank you very much for the quick reply!
Cheers!
You’re welcome! 😀
I really like your inventory system. It seems well thought out. However, I am very new to Playmaker, and I am having some issues with this system. First, what exactly are the Inventory and Collected Items Playmaker Array List Proxy components? I can’t seem to create the Array List Easy Save file. I get the error “ArrayList Proxy reference do not match”. I am still trying to figure this out. Any help or suggestions would be greatly appreciated. Thank you.
Hi Jim, those proxy components are something Playmaker creates automatically to keep track of things, allowing you to reference multiple, different arrays within the same save file. You can force it to add one either by clicking on the error message you get in the Playmaker editor or there’s a drop down option in the Playmaker Add ons / Arraymaker menu. Once you have a proxy, check in the inspector and make sure you’ve given it a name in the Reference text box. After that, when you’re using any Load / Save actions you need to make sure you use the same Reference, otherwise you’ll get the error you mention. It sure is confusing sometimes, hope that helps a bit!
Thank you very much for your help. It seems to be working; although, I do not have the entire system in place yet.
When I pick up my item ( a key), in both of the Inventory and Collected Items Play Maker Array Proxys, the Content counter changes from 0 to 1. I assume that means the item has been added to the array?
Also, I am not sure how wise this is, but I have built a seperate scene that I wanted to have all of the inventory items show up in. When the user pushes a button, the new Inventory scene is loaded. How would I apporach adding the item icons to this seperate screen? Is loading a new scene a decent way to approach an inventory screen?
Again, thank you for your help.
Sounds like you’re getting there! Depending on how you’re storing the items in the array you should also see a list of what it contains? As far as having an entirely separate scene, the above system should work okay, I move between scenes in the video. The arrays are just keeping track of what you add and remove, once they’re saved externally it shouldn’t matter if you change scene. You could just iterate through the relevant array then, and load/spawn the necessary items every time you open your inventory perhaps?
Hello,
I have noticed that when using the Load Level action in Playmaker, the objects in the scene are destroyed. This includes the Inventory Items. So the inventory Items are never loaded for the next scene. When the previous scene is loaded with the Load Level action, the objects from the previous scene are loaded again. As a result, the Scene Items that the user just picked up are loaded all over again. How did you resolve these issues? I know that the Don’t Destroy On Load action can be used. However, I did not noticed that you used that action in your system.
Thank you for your help.
Jim
Hi Jim, not sure what the specific issue here is, but in the above solution I always have all the potential inventory objects available in every scene. This way they’e always available and the inventory just keeps track of what’s active and in what order. The basic principal is making sure your inventory save file is as you want it between scenes, then you can re-build your items whenever you need them. That’s why I have the two arrays, one of gameObjects and one of names as strings, for scene items, ie. items that only exist in certain scenes, I can use the string to run a gameObject.Find. Bear in mind this setup is for a slow paced point-&-click adventure, I haven’t really worried about optimizing it for speed! I might also be looking into an alternative approach pretty soon as GameObject.SetActiveRecursively has now been deprecated for two full versions of Unity! http://docs.unity3d.com/Manual/UpgradeGuide3540.html
Hello,
Well, it does seem to work a bit better when the Inventory_ITEMS are placed into the inventory menu scene that I have.
I am not sure I fully understand what some of the variables are doing. For example, I have noticed that the Inventory_ITEMS_Object and Scene_ITEMS_Objects variables are of type Game Object. Are they supposed to have the Inventory_ITEMS and Scene Items Game Objects placed into them manually?
Also, what are the Result_INV_Item, Selected_INV_Item, Current_Scene_Object and Current_Scene_Item Game Object variables doing? I am assuming they store the scene and item objects. Do they do this automatically?
Sorry to ask so many general questions, but I really want to understand your process.
Thanks,
Jim
I wouldn’t take too much specifically from the way I’ve organized/named the variables, as you can see I haven’t done a great job of eliminating confusion!
Inventory_ITEMS_Object and Scene_ITEMS_Objects are just the Playmaker/script references to the parent objects you can see in the screenshots at the top, Inventory_ITEMS and Scene_Items. You should create those two variables in Playmaker and drag the objects on. After that, when they’re referenced in an FSM you can just use the drop-down list.
Selected_INV_Item is the inventory item the player has clicked on and the Result_INV_Item is what appears if the player clicks on a compatible inventory item with another selected.
Current_Scene_Item is used to momentarily store the strings from the Collected_Items array, one at a time, while iterating through. Current_Scene_Object is then used to store a reference to the actual object that exists in the scene once it’s been found via the string. You can see them in red in this pic: http://www.holyfingers.co.uk/main/wp-content/gallery/inventory-tutorial-inventory-screen/inventory_screen_2.png You can’t perform object actions directly on a string and, as we saw before, storing an array of objects has some issues, this allows you to sort of jump between the two.
Hello,
I want to thank you for your help. I finally have the inventory system running, and it seems to be working quite well. However, I have bypassed the ability to combine inventory items for the time being. I will try to get that to work next, but the system is allowing me to collect and use items across scenes.
Again, thank you for your help.
Jim
😀 No problem Jim! Glad you got it working!